• Free Delivery Islandwide

  • 2-year warranty

  • 7-day returns

  • Sign up and save

0

Shopping cart

There are currently no items in your shopping cart.

    Philips Support

    How to connect the Philips PicoPix 4010 to a laptop using the optional VGA cable PPA1250?

    Published on 2021-07-11

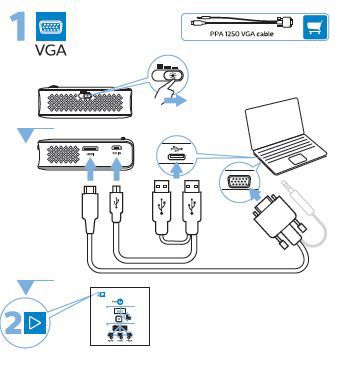
    If your laptop is equipped with a VGA output, you can connect it to the PPX4010 using the optional cable PPA1250 (not supplied with the picopix), below are the steps:

    1. Connect the USB-Y-cable to the USB/DC-in slot on the projector
    2. Connect USB plugs on the other end to the laptop
    3. Connect the VGA mini-HDMI-end to the projector's mini-HDMI socket
    4. Connect the VGA plug to the computer's VGA socket
    5. Adjust the computer's resolution to the correct setting and switch the VGA signal to an external monitor

    Note: The 3,5mm audio plug on the VGA cable is not needed as the PPX4010 does not have a built in speakers.

    Connecting the projector to a laptop

    The information on this page applies to the following models: PPX4010/INT .

    Contact Philips

    We are happy to help you

    Looking for something else?

    Discover all Philips Support options

    You are about to visit a Philips global content page

    Continue

    Our site can best be viewed with the latest version of Microsoft Edge, Google Chrome or Firefox.