• Free Delivery Islandwide

  • 2-year warranty

  • 7-day returns

  • Sign up and save

0

Shopping cart

There are currently no items in your shopping cart.

    Philips Support

    How to connect several external devices to Philips TV?

    Published on 2016-12-29

    Your TV is equipped with several types of connections. The type of connection you should use to connect a certain device depends on which features of the particular device you want to use.

    NOTE: for the connection of a PC refer to the FAQ on this subject.
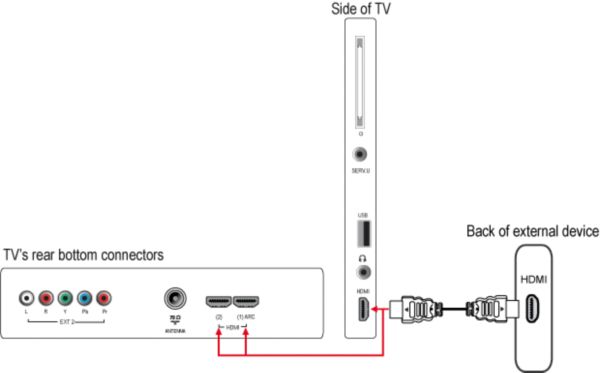
    Digital connection

    • The most complete connection available on your TV is the HDMI connection. This connection accepts high definition (HD) signals from external devices, such as a digital Set Top Box, a DVD-player or a game console such as the PS3.

    NOTE: The HDMI connection only supports the LPCM (Linear Pulse Code Modulation) and AC3 (Dolby Digital) audio formats. The DTS (Digital Theater Systems) audio format is not supported via HDMI.

    Analogue connection

    • If you want to connect more than one of this kind of external devices, the YPbPr (also called component or YUV) connection is a good choice.

    • The Scart connection on this TV accepts RGB and CVBS signals. The RGB signals offer a higher picture quality than CVBS signals. To record what you view on the TV connect to ‘EXT1’. The recording (on an external recorder) will be in CVBS quality.

    • Your TV DOES NOT have a composite video (CVBS) cinch input connection. If your device has a CVBS output, but not SCART connection, you can purchase a SCART-to-cinch cable. Insert the SCART connector into the SCART connection on your TV and connect the yellow, red and white cinch cables to the corresponding CVBS outputs of the external device.

    After connecting several devices, press the [Source] button on the remote control. Use the cursor [Up] or [Down] to select the TV connection you have used to connect your devices and press the [OK] button in order to watch their programme.

    NOTE: If the source is HDMI or Scart, the TV will automatically switch to the source input.

    Alternately, you may add the new device(s) to the home menu and select the device via the home menu. If a device is no longer connected to the TV, you can remove it from the home menu.

    Follow this procedure to add your devices:

    1. Press the [Home] button on the remote control to access the home menu.

    2. Use the [Cursor buttons] to select [Add new device] and press the [OK] button.

    3. A message appears, prompting you to add a new device.

    4. Select [Start] and press the [OK] button.

    5. Use the cursor [Up] or [Down] to select the device you wish to add and press the [OK] button.

    6. Use the cursor [Up] or [Down] to select the TV connector you have used to connect the device and press the [OK] button.
      NOTE: If a particular connector has already been assigned to another device, it will not show up in the list of connectors.

    7. When the guide is completed, press the [OK] button.

    8. A new device icon is added to the home menu.

    9. Repeat step 2 and 7 if you wish to add more devices.

    10. Press the [Back] button to exit the menu.

    NOTE: You will not be able to change the TV connector of a previously added device. If you wish to change the TV connector of a previously added device, you will have to delete this device and re-add it with the desired connector.

    Follow this procedure to remove your devices:

    1. Press the [Home] button on the remote control to access the home menu.
    2. Use the [Cursor buttons] to select the device you wish to delete.
    3. Press the [Options] button.
    4. Select [Remove device] and press the [OK] button.
    5. A message appears, prompting you to remove the device.
    6. Select [Remove] and press the [OK] button.
    7. The selected device icon is deleted from the home menu.
    8. Repeat step 2 and 6 if you wish to delete more devices.
    9. Press the [Back] button to exit the menu.

    Audio connection

    • Connect an audio device (home cinema set, amplifier) to the ‘DIGITAL AUDIO OUT’ (coaxial) connection at the back of the TV to hear the sound of the TV through your audio system.

    Your TV DOES NOT have an analogue audio out (red and white) cinch connection. In order to connect the audio out from the TV to an analogue stereo system, you will need a SCART-to-cinch cable. Insert the SCART connector into the SCART connection on your TV and connect the red and white cinch cables to the corresponding audio input on the stereo system.

    NOTE: This TV does not support the DTS (Digital Theater Systems) audio format. Therefore, the DTS audio signal will not pass through the ‘HDMI 1 ARC’ (HDMI Audio Return Channel) or the ‘DIGITAL AUDIO OUT’ (SPDIF) connection.

    • Connect headphones to the side connector. Adjust the headphones volume using the headphones volume in the [Setup] > [TV settings] > [Sound] > [Headphone volume] and press the [Mute] button on the remote control to mute the TV loudspeaker.

    Multimedia connection

    Connect a USB memory device to the side USB connector.

    • Your TV supports playback of multimedia files in JPEG (Photos), MP3 (Music) and Video files.
    • Portable hard discs are only supported as a mass storage device without any multimedia capabilities.
    • If your portable hard disc comes with multimedia capabilities, you have to connect your hard disc as a standard peripheral device.

    If the above solution does not help, you may refer to the Philips Connectivity Guide on the Contact & support page, which will assist you in making all the necessary connections.

    HDMI connection

    YPbPr (also called component or YUV) connection

    Scart connection

    Composite video (CVBS) connection

    Digital Audio Out connection

    Analogue stereo system connection

    Headphones connection

    The information on this page applies to the following models: 40PFL5606H/58 .

    Frequently Asked Questions

    Looking for something else?

    Discover all Philips Support options

    You are about to visit a Philips global content page

    Continue

    Our site can best be viewed with the latest version of Microsoft Edge, Google Chrome or Firefox.