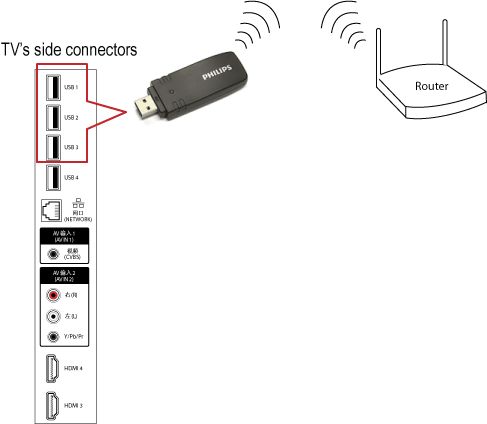
To connect your TV to your wireless home network, you need a compatible wireless router and the Philips Wireless USB adapter.
How to establish a wireless connection between my Philips TV and my home network?
Steps 1-2
1) Make sure that your wireless router is switched on and the wireless function enabled. Consult your routers user manual.
2) Switch your TV on and connect the Philips Wireless USB adapter to the USB 1 to 3 ports on the side of your TV.
NOTE: USB 4 port does not support wireless USB adapter.

Steps 3-8
3) Press the [Home] button on the remote control to access the home menu.
4) Use the cursor buttons [Up][Down][Left][Right] to select [Setup] and press the [OK] button to confirm.
5) Select [TV settings] > [Network settings] > [Network type] and press the [OK] button.
6) Select [Wireless] and press the [OK] button to confirm.
7) Press the cursor [Down] to select [Wireless Setting] and press the [OK] button.
8) If you have previously connected your TV to your home network, you will be prompted to make a selection.
- Press the [OK] button if you want to reconnect your TV to your home network
- Press the [Back] button if you want to keep the router in its current configuration

Steps 9-a
9) Select [Scan] or [Manual] and press the [OK] button.
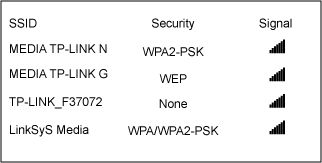
A. Select [Scan] to search for your router in the network.
- The router presents itself with a certain name (SSID). When scanning for a network you may see several names, both your router's and those of neighbouring houses or apartments. In the list, select the router you are sure it is yours and press the [OK] button.

Steps 9-b-1
B. Select [Manual] to manually enter your router name (SSID).
1) Press the [OK] button to use the onscreen keyboard to enter the router name (SSID).

Steps 9-b-2-4
2) Once you have entered the router name, select [Done] on the keyboard and press the [OK] button.
3) Select [Done] and press the [OK] button to confirm the router name.
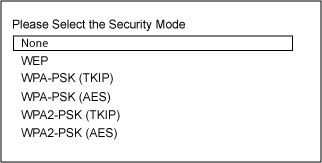
4) Select the security mode of your router and press the [OK] button.

Steps 10-11
10) You may need to enter the security password you have set for your router (consult your routers user manual).
NOTE: If you are connected to an unsecured network, the installation will skip to step 14.
11) Press the [OK] button to use the onscreen keyboard to enter the encryption key.

Steps 12-15
12) Once you have entered the encryption key, select [Done] on the keyboard and press the [OK] button.
NOTE: The encryption key is set on the router. You need to enter your router's IP address into the web browser in order to access the router configuration page. Consult your routers user manual.
13) Select [Done] and press the [OK] button to confirm your security password.
14) Please wait, your TV may take some time to connect to your home network.
15) Once the TV is successfully connected to your home network, press the [OK] button.

Step 16
16) To view all current network settings (such as the IP and MAC address, signal strength, speed, encryption method, etc.) select [View network settings] and [View wireless settings].
