In this article, you can find the instructions on how to install and mount your Philips Wireless Video Doorbell. Both for wired and wireless installation. You can also find detailed instructions in the Quick Start Guide included in the box.
How to install my Philips Wireless Video Doorbell?
Published on 05 March 2024
The Philips Wireless Video Doorbell can be installed in two different ways:
- Wireless: the doorbell is battery-operated and can be placed anywhere you like. This requires the doorbell to be charged.
- Wired: install the doorbell onto the wires and chime of an existing doorbell. This will also power the doorbell; no charging is needed.
Important before getting started:
- Please have your Wi-Fi network name and password at hand.
- Make sure your mobile device is running IOS 15 or higher or Android 8 or higher.
- Only connect to a 2.4 GHz Wi-Fi network. (5 GHz network not supported).
How to install and mount the wireless video doorbell
The video and instructions below will help you with the installation and mounting of the wireless video doorbell.
Setting up:
Wireless installation (option 1):
Wired installation (option 2):
If this does not answer your question, please contact us.
Setting up:
- Download the Philips Home Safety app.
- Open the back rubber lid, where you can find the charging Entrance.
- Plug in the USB cable to charge.
- Pair the doorbell by following the steps in the app. To get the Doorbell in pairing mode; press the Reset button next to the charging entrance for 5 seconds and wait for audio feedback.
- (Optional) Open the side rubber lid by hand and insert the Micro SD card.
Wireless installation (option 1):
- Fully charge the doorbell. You can see the battery status in the live feed in the app.
- If you still have an existing doorbell, switch it off and remove it.
- Check if you can reuse any existing holes and anchors.
- We recommend a minimum height of 48 inches (1.2 meters) from the ground.
- Check the live view in the app to make sure you have the best view. You may need to install the angle bracket or move the position.
- Use the drilling template to drill new holes. And place anchors for hard surfaces.
- Fix your bracket to the wall using the fixing screws.
- Mount the doorbell on the bracket: align the doorbell at the bottom and then push up until it snaps into place at the top.
Wired installation (option 2):
- Turn off the power at the breaker and confirm by toggling the home lights.
- Use the provided jumper cable to connect both terminals in your doorbell’s chime, one cable end to ‘Front’ and the other to ‘Trans’.
- Uninstall the existing doorbell from the wall, carefully pull out the wires, and straighten the wire ends if needed.
- Check if you can reuse any existing holes and anchors.
- Check the live view in the app to make sure you have the best view. You may need to install the angle bracket or move the position.
- Use the drilling template if you need to drill new holes. And place anchors for hard surfaces.
- Fix your bracket to the wall using the fixing screws.
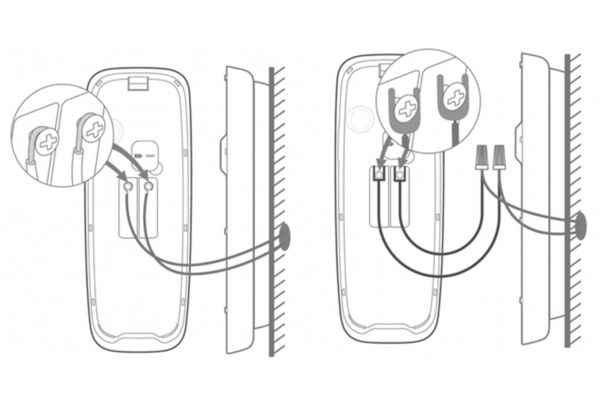
- Connect the wires to the doorbell using the small terminal screws (see the images below).
-
- Option 1: Screw in the small terminal screws halfway. Form a small circle with the wire ends and loop them around the screws. Finally, tighten the small terminal screws to securely fasten the wires to the doorbell.
-
-
-
- Option 2: For short doorbell wires, use the extensions. Attach them to your existing wires, twist them together, and secure them with grey screw tops. Connect the V-shaped end to the doorbell and screw in terminal screws halfway. Join the V-shaped ends and tighten the screws for a secure connection.
-
- Mount the doorbell on the bracket: align the doorbell at the bottom and then push up until it snaps into place at the top.
If this does not answer your question, please contact us.
Play Pause